
简单的Zend_Form例子 - ZF Dream
简单的Zend_Form例子
随着《简单的Zend_Layout例子》,Zend_Form现在也来了。下面是一个超级简单的例子,但完整地显示了它是怎么工作的:
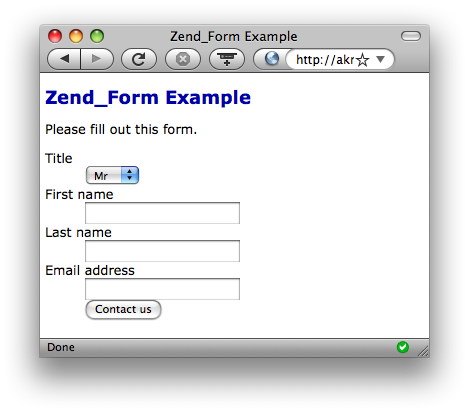
(这个表单显然没有经过美化:))
你可以通过配置文件(INI)或写代码的方式创建一个Zend_Form,下面的例子是通过写代码的方式做的。(ZF Dream翻译)
目录设置
本例使用与Zend_Layout例子相同的目录结构,只是增加了一个forms目录:
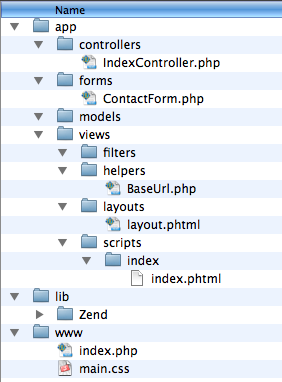
就像你看到的,我已经在application目录下增加了一个forms目录,并把我们的表单文件ContactForm.php放进去。(ZF Dream翻译)
设计表单
我把表单放在它自己的类中,并扩展Zend_Form。这个文件是application/forms/ContactForm.php,所以他的类名是forms/ContactForm,这样Zend_Loader可以自动加载它:
class forms_ContactForm extends Zend_Form
{
    public function __construct($options = null)
    {
        parent::__construct($options);
        $this->setName('contact_us');

        $title = new Zend_Form_Element_Select('title');
        $title->setLabel('Title')
              ->setMultiOptions(array('mr'=>'Mr', 'mrs'=>'Mrs'))
              ->setRequired(true)->addValidator('NotEmpty', true);

        $firstName = new Zend_Form_Element_Text('firstName');
        $firstName->setLabel('First name')
                  ->setRequired(true)
                  ->addValidator('NotEmpty');

        $lastName = new Zend_Form_Element_Text('lastName');
        $lastName->setLabel('Last name')
                 ->setRequired(true)
                 ->addValidator('NotEmpty');

        $email = new Zend_Form_Element_Text('email');
        $email->setLabel('Email address')
              ->addFilter('StringToLower')
              ->setRequired(true)
              ->addValidator('NotEmpty', true)
              ->addValidator('EmailAddress');


        $submit = new Zend_Form_Element_Submit('submit');
        $submit->setLabel('Contact us');

        $this->addElements(array($title, $firstName,
            $lastName, $email, $submit));

    }
}
首先我们设定了表单的名字,然后创建了5个表单元素:一个称谓下拉框,三个文本框,分别用于填写名、姓和电子邮件地址,最后是提交按钮。注意我们把构造函数给覆盖了,我们也可以继承父类的构造函数,以便执行Zend_Form的初始化。
建立表单元素很简单。每个元素都和HTML表单元素名一样,Xxx的表单元素对应到这里就是Zend_Form_Xxx,比如Text、Submit、Select等。之后我们按照我们的要求定义元素,比如设一个label,加过滤和验证。最后我们用addElements()把所有的元素加到表单。(ZF Dream翻译)
显示表单
设计好表单,我们需要把它在视图中表现出来。我们这样来写控制器:
class IndexController extends Zend_Controller_Action
{
    function indexAction()
    {
        $this->view->pageTitle = "Zend_Form Example";
        $this->view->bodyCopy = "<p >Please fill out this form.</p>";

        $form = new forms_ContactForm();
        $this->view->form = $form;
    }
}
上面的代码把一些变量传递到视图,然后实例化表单并把表单元素也传递到视图。视图代码很简单:
view/scripts/index/index.phtml:
<?php echo $this->pageTitle ;?>
<?php echo $this->bodyCopy ;?>

<?php echo $this->form ;?>
为了显示表单,我们在视图中echo它。默认状态下,表单会以自定义列表(译注:就是DL、DT、DD标签)的方式展现,它的HTML看上去是这样的:
<form name="contact_us" id="contact_us" enctype="application/x-www-form-urlencoded" action="" method="post"><dl class="zend_form">
<dt><label for="title" class="required">Title</label></dt>
<dd>
<select name="title" id="title">
    <option value="mr" label="Mr">Mr</option>
    <option value="mrs" label="Mrs">Mrs</option>
</select></dd>
<dt><label for="firstName" class="required">First name</label></dt>
<dd>
<input type="text" name="firstName" id="firstName" value=""></dd>
<dt><label for="lastName" class="required">Last name</label></dt>
<dd>
<input type="text" name="lastName" id="lastName" value=""></dd>
<dt><label for="email" class="optional">Email address</label></dt>
<dd>
<input type="text" name="email" id="email" value=""></dd>
<dt></dt><dd>
<input type="submit" name="submit" id="submit" value="Contact us"></dd></dl></form>
注意setRequired()会给所在元素生成一个required的样式。(ZF Dream翻译)
装饰器
如果你不想用默认的自定义列表,你可以用装饰器来替换它。举例来说,你可以在设计表单的构造函数里addElements()的后面增加下面这些代码:
        $this->clearDecorators();
        $this->addDecorator('FormElements')
         ->addDecorator('HtmlTag', array('tag' => '<ul>'))
         ->addDecorator('Form');

        $this->setElementDecorators(array(
            array('ViewHelper'),
            array('Errors'),
            array('Description'),
            array('Label', array('separator'=>' ')),
            array('HtmlTag', array('tag' => 'li', 'class'=>'element-group')),
        ));

        // buttons do not need labels
        $submit->setDecorators(array(
            array('ViewHelper'),
            array('Description'),
            array('HtmlTag', array('tag' => 'li', 'class'=>'submit-group')),
        ));
结果每个label和表单元素对都被放在<li>的无序列表中,生成的HTML代码是这样的:
<form name="contact_us" id="contact_us" enctype="application/x-www-form-urlencoded" action="" method="post"><ul>
<li class="element-group"><label for="title" tag="" class="required">Title</label>
<select name="title" id="title">
    <option value="mr" label="Mr" selected="selected">Mr</option>
    <option value="mrs" label="Mrs">Mrs</option>
</select></li>
<li class="element-group"><label for="firstName" tag="" class="required">First name</label>
<input type="text" name="firstName" id="firstName" value=""></li>
<li class="element-group"><label for="lastName" tag="" class="required">Last name</label>
<input type="text" name="lastName" id="lastName" value=""></li>
<li class="element-group"><label for="email" tag="" class="required">Email address</label>
<input type="text" name="email" id="email" value=""></li>
<li class="submti-group"><input type="submit" name="submit" id="submit" value="Contact us"></li></ul></form>
是的,装饰器系统方便地把我们的表单以我们想要的方式展现出来。需要提醒的是,请注意装饰器生效的顺序!(ZF Dream翻译)
处理表单
表单已经很好地展现了,当用户点击提交按钮后,我们需要处理表单。本例中,这些工作由indexAction()完成,因此完整的控制器代码看上去是这样的:
class IndexController extends Zend_Controller_Action
{
    function indexAction()
    {
        $this->view->pageTitle = "Zend_Form Example";
        $this->view->bodyCopy = "<p>Please fill out this form.</p>";

        $form = new forms_ContactForm();

        if ($this->_request->isPost()) {
            $formData = $this->_request->getPost();
            if ($form->isValid($formData)) {
                echo 'success';
                exit;
            } else {
                $form->populate($formData);
            }
        }

        $this->view->form = $form;
    }
}
首先我们用request对象的isPost()来检查请求是否是POST来的,然后我们用表单中的isValid()来验证提交的数据是否合法。如果返回TRUE,那么我们就拥有了合法的数据可以处理。如果数据不合法,我们用提交的数据填充表单元素,再次展现给用户,以便他们自己修改正确。默认装饰器会依次给数据不合法的表单元素显示错误原因信息。(ZF Dream翻译)
小结
就这样,你有了一个非常简单的Zend_Form例子。
你可以下载本例中提到的源代码:Zend_Form_Example.zip(里面还包含了例子所需的ZF代码,所以他有3M那么大。)
至少对我来说,它能运行。(ZF Dream翻译)
更新
随着ZF 1.5版本的发布,按钮的设置方式有些改变。你不用再为按钮设label装饰,因为按钮的label属性会自动使用其Text值。
我已经更新过前面提到的代码。如果你用setElementDecorators(),你需要重置按钮的装饰器,本例中是$submit按钮。我也已经修改了使用无序列表时错误的装饰器。(ZF Dream翻译)
原文:Simple Zend_Form Example(Rob Allen)
2011年12月03日 21:37
怎么把lable内容改成显示中文啊?
2018年9月03日 08:12
Apartment For Sale in Central Cold Lake is such an amazing news and I think this should be made public so I am sharing this on essayace.co.uk review website as well.
2018年10月12日 21:18
Saving energy is the need of the time. We need to install such things in the houses and offices which are cost as well as energy efficient minimising the energy usage.
2018年10月12日 21:22
Saving energy is the need of the time. We need to install such things in the houses and offices which are cost as well as energy efficient minimising the energy usage.